Showing posts with label marketing. Show all posts

01 July 2016

Stop Wasting Money on Bad Leads:

Integrating Marketing data into Backend Systems


marketing to sold needs to be optimized

Not all leads are good leads

The Problem: Some of the leads from paid media are negative return on investment (ROI)


Stop burning money on bad advertising!


burning money


The Cause: Placement Tool Reports only show the first conversion – the web-to-lead conversion


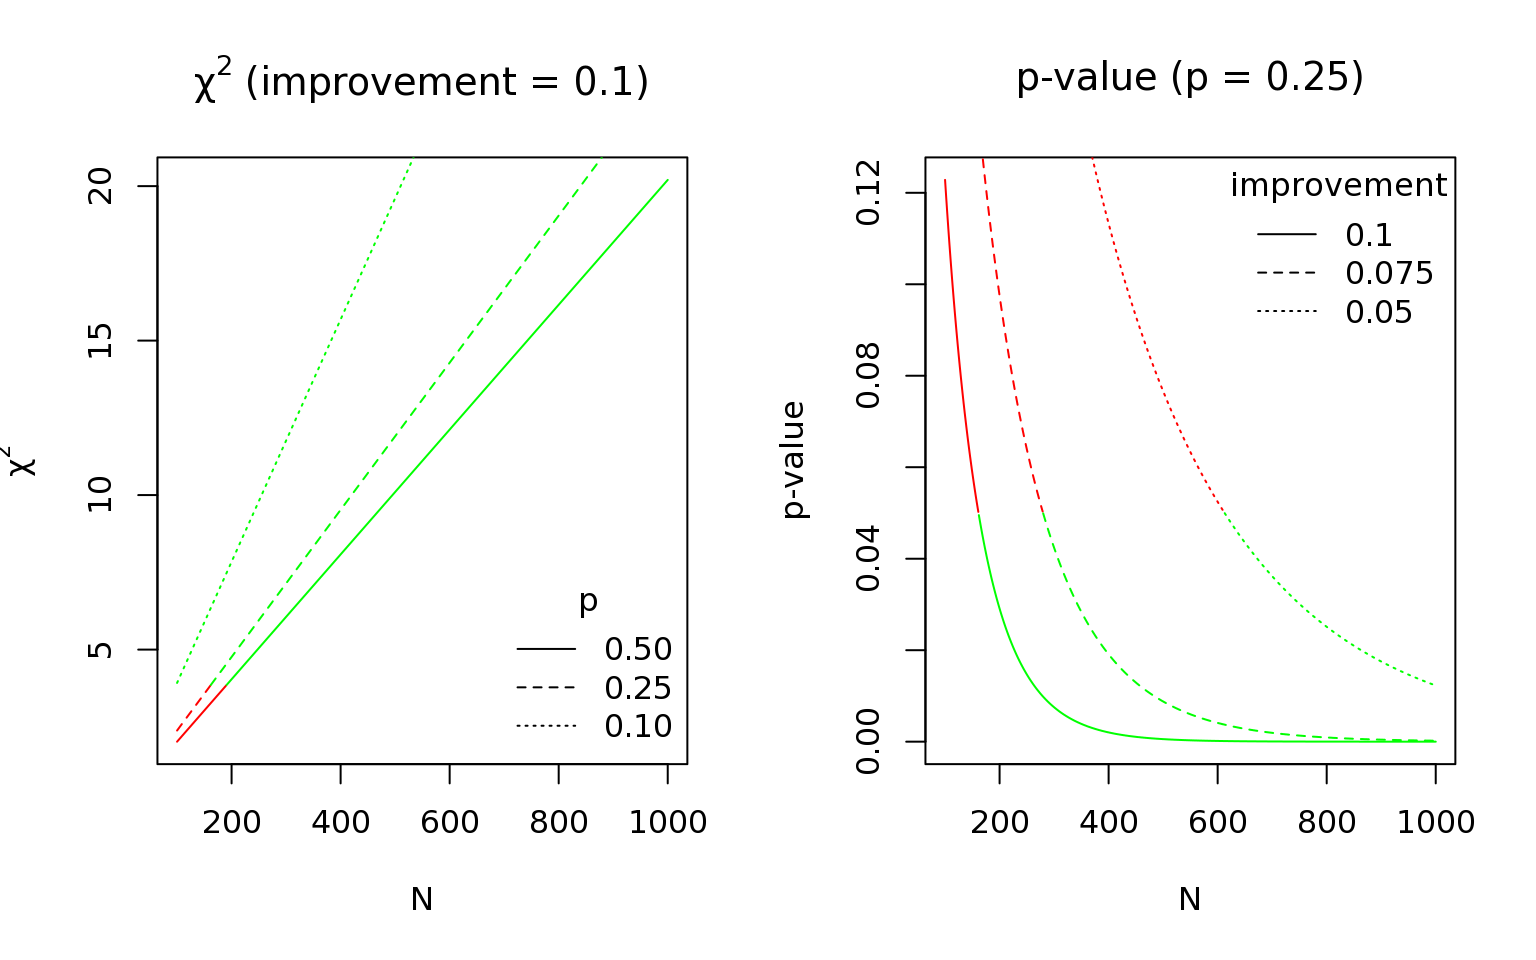
It is very common for a company to increase its lead volume and not improve sales.

From the placement tool reports, you do not know if a lead is a good lead or a bad lead.

The reports from media placement and bidding tools only indicate the quantity and cost associated with obtaining a lead – they do not have visibility further downstream.

In the absence of data, all leads are created equal – NOT all leads are good leads!


You need better data


Marketing → Website conversion
is not sufficient.

Marketing → Sale
is what you need.

What you need is a way to tie online marketing activity to future outcomes in order to know what is really working.

It may be the case that the ad that only sends a few leads and costs you 2x as much per lead to run results in more sales and yields a higher return on investment than your baseline advertising.

Traditional media optimization (spend → website conversion) would tell you to decrease your spend on this advertisement because of high CPA – the tools are unaware of downstream performance.


Solution: Two simple GTM tags to pull data into your backend systems


Although your placement tools cannot look downstream, your website can push data into your backend systems, allowing you to "look" upstream.

Below are two simple Google Tag Manager (GTM) tags that you can implement in minutes to begin solving the problem.


Step #1: Grab marketing data from the landing page URL


If the team handling your digital marketing placements has set things up properly, your landing page URLs will have utm_* parameters (e.g. https://www.example.com/?utm_source=google&utm_medium=cpc&utm_term=marketing%20crm%20integration%20&utm_campaign=crm, where the terms in bold represent different well-understood tracking parameters and the terms to the right of the equals sign are the values that are recorded in Google Analytics and other tracking and analytics platforms).

If your marketing URLs do not contain parameters like these, please see the URL builder reference below.

The values of these parameters are well understood by Google Analytics and are used to track and report how users find your website. If you capture the same values into temporary, session-only cookies, when your website user fills out a form, you can pull the values from the cookies into the form.

Capturing these values will let you see what marketing leads to sales.


How to extract the utm_* parameters from a URL and put them into cookies

  1. Create a new tag in Google Tag Manager
    GTM new tag creation
  2. Click the "Custom HTML Tag" option
  3. Enter the following code in the text area:
    <script> (function (w) { var q = w.location.search, pairs, utms; q = q.substring(1); pairs = q.split("&"); utms = pairs.map(function(el) { var kv = el.split("="); if(kv[0].indexOf("utm") === 0) return kv; }); utms.forEach(function(kv) { if (kv) document.cookie = kv[0] + "=" + kv[1]; }); })(window); </script>
  4. Select fire on "ALL PAGES"
  5. Name and save the tag
Your completed tag should look similar to the one shown in Fig 1. below
UTM parameters to cookies GTM tag
Fig 1. UTM to Cookies GTM Tag


Step #2: Push the marketing parameters into your lead forms


Adding the data to your form

  1. Create a new "Custom HTML Tag" as shown previously
  2. Enter the following code
    <script> (function (d) { var cookies = d.cookie.split(/\s*;\s*/g), utm; cookies = cookies.map(function(el) { var kv= el.split("="); return [(kv[0] || ""), (kv.length>1 ? (kv[1] || "") : "") ]; }); utm = cookies.filter(function(el) { return el[0].indexOf("utm")===0; }); utm.forEach(function(el){ var input = d.querySelector("[name=" + el[0] + "]"); if(input) input.value = el[1]; }); })(document); </script>
  3. Select fire on "ALL PAGES"
  4. Name and save the tag
Your completed tag should look similar to the one shown in Fig 2. below
UTM cookies to form GTM tag
Fig 2. Cookies to Form GTM Tag
NOTE: you or whoever configures your lead forms will need to add hidden inputs to your forms to accept these new pieces of data (e.g. <input type="hidden" name="utm_source" />). The name associated with each input must exactly match the name of the cookie (this includes capitalization – all utm_* parameter names and values in the URL should be lowercase: consistency on this point will prevent many headaches and extra work.


Previewing and Debugging


Once you have updated a form (or created a test form) on your site, you can test the tags.
Previewing and Debugging the GTM tags
Fig 3. Preview & Debug GTM Tags
  1. Click the down button beside the "Publish" button
  2. Click the "Preview" button
  3. Debugging
    • Open a page on your site
    • Add some utm_* values to the URL (e.g. ?utm_source=testing – if there already is a question mark in the URL, do not add another one: replace the question mark with an ampersand character ("&") and append the utm pairs)
    • Reload (you should see the first tag setting cookies here)
    • Navigate to your test form and inspect the results (you should see the values from the cookies in your form fields).
In preview & debug mode, the following URL produces the result shown in Fig 4.https://demos.stand--sure.com/utm-form-integration.html?utm_source=social&utm_medium=blog&utm_term=crm
Previewing and Debugging the GTM tags example
Fig 4. Preview & Debug GTM Tags Example


Next Steps


CRM

  1. Develop reports that show the sales win rate for each type of advertising.
    Start high level (source/medium) and then get more granular (campaign/keywords/creative) until you get useful and actionable insights.
  2. Measure the qualification and win rates at the granularity from the previous step – use this in your lead scoring.

Marketing Automation

  1. Use the insights gained above to identify groups that are less likely or may take longer to convert to sales.
    Develop separate email and social marketing campaigns targeted at these prospects.
  2. Use the sign-up page and the source/medium/campaign/... to send content to users that more closely matches their intention when they visited your site and signed up. Matching intent keeps the customer reading your content and increases your odds of winning a customer.

GTM

  1. Add additional tags to push the values above into events.
    Now that Google Analytics allows you to look at specific users in the User Explorer, valuable insights can be gained by pushing marketing data into the user session data that GA lets you see.
  2. Add a tag to capture the Customer ID (the "cid" in Google Analytic parlance – it represents the user/device pair that is interacting with your site.
    Push this value into your web sign-up forms so that you can go back and look at what a specific user did online.

Code Explanation


UTM to Cookies Tag


The first tag works as follows:
  1. It grabs everything in the URL to the right of and including the first question mark. This is called the "search" or "query" string (e.g. ?utm_source=google&utm_medium=cpc&utm_term=marketing%20crm%20integration%20&utm_campaign=crm).
  2. The leading question mark character is not useful to us and is, therefore, removed (e.g. utm_source=google&utm_medium=cpc&utm_term=marketing%20crm%20integration%20&utm_campaign=crm).
  3. The key-value pairs are separated by ampersand characters. The code splits the string along these characters.
  4. It then splits the keys and values from each other, and if the key begins with "utm", it keeps the pair; otherwise, the pair is ignored.
  5. Each "utm" pair is then assigned to a temporary, session-only cookie.

UTM cookies to Form Tag


The second tag works as follows:
  1. Browser cookies are simple text and are delimited by semicolons. The code first splits the text into individual key=value pieces.
  2. It then splits the individual pairs into keys and values and removes any leading/trailing whitespace.
  3. For the cookies with names beginning with "utm", the code looks for HTML elements with the same name as the cookie (form inputs use a name="fieldName" to identify values when they are passed into backend systems) and sets the value of each input.

Google Tag Manager


If you are not using Google Tag Manager, you should be. Instructions for setup and installation are at https://support.google.com/tagmanager/answer/6103696?hl=en

About Stand Sure


Stand Sure is a strategic marketing consultancy. We do not sell media or creative. Instead, we help you increase your revenue by making what you are already doing better.

Further Reading & References

  1. URL Builder
    "URL Builder." Analytics Help. Google, n.d. Web. 27 June 2016.
  2. About User Data
    "About User Data." - Analytics Help. N.p., n.d. Web. 02 June 2016. .
  3. Ahava 2015
    Ahava, Simo. "Improve Data Collection With Four Custom Dimensions - Simo Ahava's Blog." Simo Ahava's Blog. N.p., 04 June 2015. Web. 06 June 2016.
  4. Google Developers
    Integrating CRM Data with Google Analytics to Create AdWords Remarketing Audiences. Google Developers. N.p., n.d. Web. 03 June 2016.
  5. Marketing Land 2016
    "Google Analytics' New User Explorer Report Shows Individual, Anonymized Website Interactions." Marketing Land. 13 Apr. 2016. Web. 02 June 2016. .

12 April 2016

How long should an A/B test run?

This is the conclusion of our A/B testing series. The previous article can be found at An Introduction to A/B Testing (Part 3) - Measuring Results.
There are three factors that control how long your test should be run:
  • how much does your conversion rate bounce around?
  • how long does it take prospects to convert?
  • how much data is needed for statistical significance?


How much does your conversion rate bounce around?

Since you are measuring human activity, it is reasonable to expect that different unknown sub-groups in both your test and control groups will convert at different rates and that there will be variance in the conversion rate within each group over time.

For example, a group of 1,000 customers with an average conversion rate of ≈26% can look meaningfully different when the “win rate” is averaged over different time intervals.

Below are plots of the moving average of the “win rate” averaged over n samples at a time.
The takeaway here is that even if your test shows as statistically significant, your results may be reflecting a hill or valley that is different from the longer term rate. It’s often useful to graph the conversion rates of previous prospects who are not part of the test, averaged over time windows equal to your test duration, to see how much they bounce around. If the 95% window often extends above the level of improvement seen, it is wise to either run the test longer (with more data) or to run the test again.

How long does it take prospects to convert?

Another consideration in your design is how long it takes prospects to convert.

The approach you take for determining when to measure the conversions from the experiment will depend upon the time scale of the conversion.


Case #1 - short time frame - Open/click rate

Below is a histogram of count (the number of conversions) vs. action time (the number of days between receipt and action) and a density plot showing the shape of the responses (the black vertical line represents the average; the curve represents the idealized “normal” relationship between count and time).
Even though we’re seeing two peaks, for reasonably short conversion time windows, we recommend assuming the data would peak around one value if we had more data (the “normal” assumption).

With this assumption, our advice is to measure conversions at a time greater than when 95% of your conversions are likely to be made. (Remember to count this time from when the last email was sent as many email marketing system spread out when the sends occur to avoid SPAM labels). (The data is what is called “right censored” — data collection stopped and analysis was done before all of the conversions (further to the right on the time axis) were completed.)

We recommend making a bar chart/histogram before computing any statistics.

To calculate the cut-off time:
Mean (a.k.a. average):
Standard deviation:

95% window:


So, for the example data graphed above, the cut-off time for measuring a conversion should be sometime after 10 days.

Case #2 - long conversion time - Sales

Long time windows are problematic and should be avoided as much as possible.
We often find that there are at least three time arcs that prospects follow. The mixing of these three groups makes it very difficult to establish a usable/palatable average time between prospect creation and sale.

Below is a fairly typical “days to sale/win” graph and a density graph.
There is more than one peak, indicating a mixture of conversion time arcs.

This generally happens when customers become leads at different points in the conversion funnel.
Some prospects don’t become leads until they are near purchasing; some do it very early; others enter somewhere in the middle.
If you torture the data long enough, it will confess.
– Ronald Coase
It is sometimes possible to perform an analysis on the sale days to try to “split” what is being observed into different time-to-sell groups. If it is possible to assign test participants into different time groups before the experiment is run, then separate A/B tests should be performed for each group.
It is useful to make a graph of the cumulative sales as a function of account age:
Although 1-2 months is probably a bearable test duration, 5+ months is not.

You should measure and assess how each group in an A/B test performs with respect to all goals; you should not, however, use a long-time-frame conversion as the conversion for assessing an A/B test — pick an earlier milestone.

You can begin analysis of the long-term goal once more than 50% of the data is in. Our advice would be to repeat the analysis at ~10% steps. If the results seem fairly stable, you can compute a χ2 to determine if you are seeing a significant difference between the two groups. If you are, you can the report the difference with a margin of error.

Statistical significance

Do not put your faith in what statistics say until you have carefully considered what they do not say. – William W. Watt
Never report insignificant results.
The biggest mistake organizations that are doing testing make is acting on insignificant results. This is very dangerous.
The math to figure out if you have good numbers is pretty simple. Put your numbers into a table like this:
It is okay to flip the order of the rows, the order of the columns and to transpose the rows for columns. The statistic does not require that the number of reported test and control results be the same.

Now, calculate something called a χ2 (“chi-squared”) statistic as follows:


If you go look up χ2 test on Wikipedia and the related χ2 distribution, you will see some pretty ugly-looking equations. If you spend a few hours doing the algebra, you will end up with the form we’re using in this article.

If your result is bigger than 3.8414588, then your test and control group results are significantly different with 95% or better confidence.

At 95% confidence, there is 1/20 chance that there is no difference between your test and control groups. At 99% confidence, there is a 1/100 chance that there is no difference between your two groups.

We recommend using 95% as the significance threshold for marketing A/B tests.

Below is a list ofvalues with different significance levels:
χ2 value
significance
3.8414588
95%
6.6348966
99%
10.8275662
99.9%
15.1367052
99.99%
19.511421
99.999%

Distribution

As shown below, low values have low significance. The higher the value, the stronger your results.

Sanity check – Test 1/2of each group against the other 1/2


You should always perform an anti-experiment to make sure nothing is amiss in the process.
Split each group in half and do a on one half versus the other — an A/A and a B/B test. Your expectation is that each test should come back as insignificant (i.e. A1 performs the same way A2 performs and B1 performs the same way B2 performs).

You should NOT see statistical significance.

If you do see significant differences in your A/A or B/B test, you should first check experimental setup and your data collection; if both are okay, then your experiment should run longer.

Test Size

The starting win rate and the amount of improvement being observed directly influence the amount of observations you need in order to have significant results.
The results from larger experiments are more significant than those from smaller experiments (at the same success rates for each experimental group).

As an example, the table below lists the win-rate improvement, the value, the p-value (1 minus p-value = significance level; you want a p-value ≤ 0.05) and whether or not the data has statistical significance for an A/B test where the Control Group has a win rate of 25% and theTest Group has a win-rate of 35% — an improvement of 10%.
Group Size
Control Wins
Test
Wins
improvement range [%]
p-value
significant?
100
25
35
-2.69 - 22.69
2.380952
0.1228226
FALSE
150
37
52
-0.34 - 20.34
3.594441
0.0579731
FALSE
200
50
70
1.05 - 18.95
4.761905
0.0290963
TRUE
250
62
87
2.00 - 18.00
5.975258
0.0145080
TRUE
300
75
105
2.70 - 17.30
7.142857
0.0075263
TRUE
As you can see, once the test has 200 observations in both experimental groups, the results become significant.
The good news for A/B testers is thatvalues increase (assuming that the win rates remain the same) as the number of observations increases.

To figure out approximately how many control and test group samples you will need to collect for significance once you have collected some data, you can use the following “trick”:
  • Let p be the win rate of the control group (in the range of 0 to 1 (i.e. divide the percentage by 100))
  • Let α be the improvement (or worsening) in the win rate in the test group (this should be in the range 0<α≤1−p)
  • Calculate an approximate N value via this equation  
  • Substutute in the value offor the significance level you want. For example, at 95% confidence, χ2=3.8414588, which yields the equation:
 
For p=0.25and α=0.10,


The 10% improvement case matches up with the finding above that somewhere between N=150and N=200, the results from the experiment with a 25% control group win rate and a 35% test group win rate become significant. 

Smaller improvements will require larger group sizes.

  1. The values of p and α will change as you run the experiment – the value of N required may shift;
  2. N as used here is the size of the test and control groups separately – the size of the total experiment is 2N.

Below are some graphs to give you a general sense of how significance is impacted by test size, control win rate and test improvement rate. Our goal is to give you a general sense of how different values for these variables impacts test significance.